By Data RecoveryUpdated on January 17, 2026
When you discover that data is missing from your Android phone, don’t panic—this is a common issue. Perhaps you accidentally deleted contacts, messages, or photos while clearing storage space, or maybe an app crashed and wiped your text messages, or your phone restarted during a system update, causing half of your files to disappear instantly. Data loss often happens in a flash, and the panic that follows can leave you feeling overwhelmed.
Data loss on Android phones is not uncommon, and nowadays there are increasingly more solutions available for recovery. This article will introduce methods to restore data on Android devices. By reading this guide and following the steps provided, you will be able to recover your lost data.
The first and also the best method to restore Android phone we would like to recommend is using Android Data Recovery.


Android Data Recovery is a reliable and user-friendly Android recovery tool that enables you to retrieve deleted files from Android devices effortlessly on both Windows and Mac operating systems. You can learn more key features from the following points:
Now you can follow the detailed steps below to restore your Android device.
Step 1 Download Android Data Recovery
First of all, you need to download Android Data Recovery. Then finish the installation according to the guide it gives you. You can also download it free to enjoy the free trial.
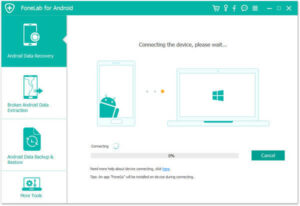
Step 2 Connect Android device
Launch Android Data Recovery on your computer. Then you need to connect your Android device to computer via a USB cable. This professional software will detect your Android phone automatically.
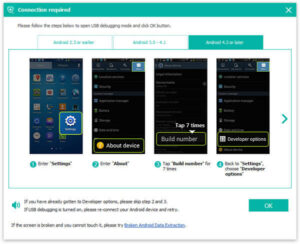
Step 3 Enable USB debugging mode
This software will prompt you to enable USB debugging on your phone if you don’t open the debugging mode. Then it will detect your Android version and give you the guide how to open this mode. Next click on OK button to continue your operation.
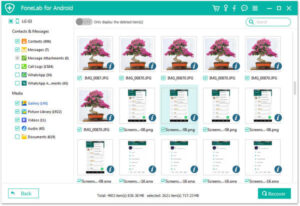
Step 4 Scan Android data
Now you can see all file types on your Android will be showed to you. Just choose the file types you want to recover from these types. Then click Next button to scan the deleted Android data.

Step 5 Restore Android phone
When the scanning process is finished, all types of files will be listed to you. Now you are allowed to check the detailed information of each data you want to know. Then preview and select what you want to recover to restore Android phone by clicking Recover button.
It’s common knowledge that an Android phone can serve as an external storage device on a Windows computer, allowing you to access the SD card in the phone conveniently. Therefore, it’s quite easy to restore data on an Android phone via the SD card. If you have previously backed up your Android phone data on a computer, you can now complete the data restoration using these backups simply through copy and paste. Below are the detailed steps for backing up and restoring your Android phone.
Backup Steps
Step 1:First, link your Android device to your computer using a USB cable.
Step 2:Once the device is successfully connected, the computer will automatically detect and recognize it, and then the Android phone will be mounted as an external storage device. (If you’re using a Mac, you need to install an Android file transfer tool or similar software on your device first.)
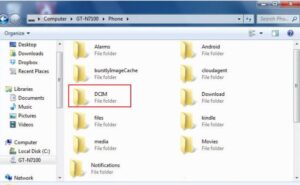
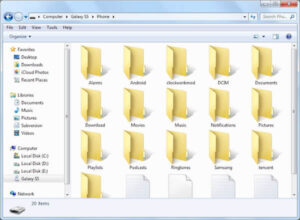
Step 3:Locate the icon of your Android phone on the computer and directly open the corresponding folder of the phone.
Step 4:At this point, you can view all files and data stored on the SD card. Select the folders and files you want to back up, copy them, and then paste them to a designated location on the computer.
After completing the above operations, you have successfully backed up your Android phone data, which can be used for data restoration at any time later.
Restoration Steps
Step 1:Connect your Android phone to the computer with a USB cable, and open the corresponding folder of the phone on the computer in the same way as you did during the backup.
Step 2:Select the data and files you want to restore from the backups saved on the computer, copy them, and then paste them to the corresponding storage location on the Android phone.
Restoring Android phone with Google account is suitable for those who have backed up Android phone with Google account previously. You can back up your contacts to Google account, as well as photos, videos, and other files, so you can also restore theses files easily.
To restore the backed up photos and videos: click on Google Photo App and then sign in your Google account. Tap photos icon and then you can see and restore your backed up photos and videos.
To restore the backed files and folders: open Google Drive App and then log in your account to view and restore these backups.
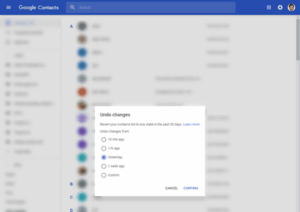
To restore contacts: go to Google Contact and then click More. Next choose Undo changes. Choose a time to go back to and next click “Confirm”.
But you can only restore the contacts you lost in the last 30 days.
This way is more suitable for those who have updated Android system but want to back to the original system. If you choose this recovery way, it is import to back up your Android phone before you restore Android phone.
It is advised to save the system backup on your SD card. You can know the way in Part 2. What follows is how to restore Android phone.
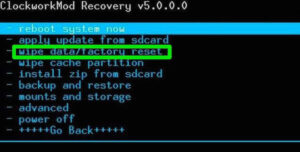
Step 1 Put Android phone into recovery mode. The way to access recovery mode is different from one phone to another, so you can search the way according to your phone model.
Step 2 Now you need to choose Backup & Restore in the options it provides to you.
Step 3 Then choose Restore and your device will begin to recover the latest system backup.
This article has outlined four distinct methods for restoring your Android phone. Based on your specific situation, you can select the most suitable approach to begin the recovery process. We hope this guide proves valuable in helping you retrieve your important data.
Copyright © 2025 DatasRecovery All rights reserved.