By Data RecoveryUpdated on January 29, 2026
As a loyal user of the iOS ecosystem, the smooth experience brought by iPhone is undeniable, but file transfer between computer and iPhone has always been a trouble for many users — unlike the direct copy-paste of Android devices, the closed nature of iOS makes data migration more complicated. Whether you want to transfer work documents, travel photos and videos, or collected music albums, this article has compiled 9 tested and efficient methods, covering professional tools, official synchronization, wireless transmission and other scenarios. Whether you use Windows or Mac computer, you can find a suitable solution to complete file migration safely and quickly.

If you pursue simple operation and support for all types of file transfer, then FoneTrans is definitely the first choice. This multi-functional tool breaks the transmission barrier between iOS and computers, compatible with all iOS device models (including iPhone 16/15 series) and iOS 18 and below versions, easily realizing cross-device data circulation.
Core Highlights:
1.Support for all file types: Photos, videos, music, contacts, messages, notes, e-books and other iOS data can be transferred
2.Multi-device interconnection: Supports two-way transfer between computers and iPhone, iPad, iPod, and can directly migrate data from old iPhone to new device
3.Intelligent adaptation: Automatically converts incompatible file formats without manual processing
4.Additional functions: Built-in practical tools such as contact backup, ringtone making, HEIC format conversion, one-stop management of iOS data
Operation Steps:
Step 1:Download and install: Download the corresponding version according to the computer system (Windows/Mac), install and launch the tool, the system will guide you to connect the device


Step 2:Device connection: Connect iPhone to computer with Apple’s original Lightning data cable, unlock iPhone and click “Trust”, enter the password to complete verification
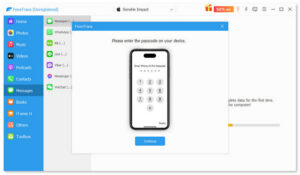
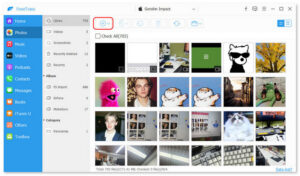
Step 3:View and manage: After the tool recognizes the device, it will display iPhone name, capacity, iOS version and other information, and all file categories can be viewed in the left panel

Step 4:Start transfer: Select the type of file to be transferred (such as “Photos”), click the “Add” button, and select files from the computer to complete the upload; for reverse transfer, select files in iPhone and click “Export to Computer”
As Apple’s official tool, iTunes is a classic synchronization method for iOS devices, suitable for users who are used to the official ecosystem. It mainly supports the transfer of common file types such as music, photos and videos, divided into two modes: File Sharing and Synchronization.
Mode 1: iTunes File Sharing (For Specific App Files)
1.Install and launch the latest version of iTunes on your computer, connect iPhone with USB data cable
2.After successful connection, click the iPhone icon in the interface and select “File Sharing” from the left menu
3.Select the iPhone app that needs to receive files (such as Keynote, Pages and other apps that support file sharing), click “Add”, and select files from the computer to complete the transfer

Mode 2: iTunes Synchronization Transfer (Bulk File Synchronization)
1.Launch iTunes and connect iPhone, click the device icon to enter the settings interface
2.Select the file category to be synchronized (such as “Music” “Photos”) from 3.the left panel
Check the “Sync” option, select the specific files to be synchronized, and click “Apply” to start the transfer
![]()
⚠️ Important Reminder: A key flaw of iTunes synchronization is that it may overwrite existing similar files on iPhone, resulting in data loss. Therefore, be sure to back up iPhone data before synchronization and confirm it is correct before operation.
If you don’t want to be limited by iTunes’ complex operations and data overwriting risks, the following 6 methods will provide you with more choices. You can achieve wireless or wired transfer without installing official tools.
Documents app developed by Readdle is a powerful iPhone file manager. Its Wi-Fi transfer function does not require data cables, with simple operation and stable speed, suitable for daily small-batch file transfer.
Operation: Connect the computer and iPhone to the same Wi-Fi, open the Documents app, click “Connect” > “Computer” in sequence, iPhone will generate an exclusive URL and a 4-digit verification code; enter the URL in the computer browser, enter the verification code, and directly drag and drop files into the browser window to synchronize to iPhone in real time.
Advantages: Wireless connection, simple setup, fast transfer; Limitations: Slightly lower efficiency for large-batch file transfer than professional tools
![]()
For users who often use the Apple ecosystem, iCloud Drive is the most convenient wireless transfer solution, realizing cross-device automatic synchronization through Apple ID without manual operation.
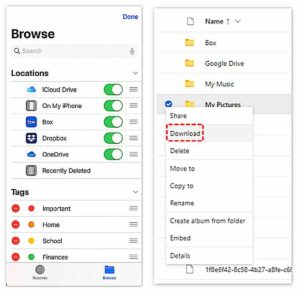
Operation: Log in to iCloud official website or client on the computer with the same Apple ID as iPhone, enable “iCloud Drive”, and put the files to be transferred into the folder; open the “Files” app on iPhone, switch to the “Browse” tab, and find “iCloud Drive” to view and download files.
Advantages: Wireless transfer, automatic synchronization, cross-platform compatibility; Limitations: Dependent on network speed, limited storage space for free version (5GB by default), not suitable for large file transfer
![]()
If you only need to transfer photos and videos, you can complete it directly through USB data cable without installing any software, suitable for users who pursue minimalist operation.
Operation: Connect iPhone to computer with USB data cable, open “This PC” (Windows) or “Finder” (Mac) on the computer, find the “iPhone” device and click to enter, select “Internal Storage” > “DCIM” > “100APPLE” folder, and directly copy and paste photos or videos from the computer into this folder.
Advantages: No additional software required, fast transfer speed; Limitations: Only supports photos and videos, not other file types or app data
![]()
Suitable for occasional transfer of small files (such as single documents, pictures), no need for data cables or dedicated apps, cross-platform universal.
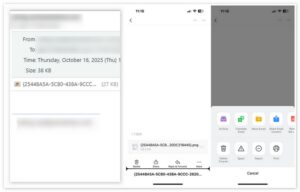
Operation: Open an email client (such as Gmail, Outlook) on the computer, compose a new email and add the files to be transferred as attachments; send the email to the email address logged in on iPhone; open the corresponding email client on iPhone, find the email and download the attachment to save.
Advantages: Simple operation, no additional tools required; Limitations: Need to upload files one by one, only suitable for small file transfer, speed depends on network connection
OneDrive cloud storage service launched by Microsoft is deeply integrated with Windows and Microsoft Office, enabling seamless cross-device access, suitable for users who often use Microsoft Office.
Operation: Log in to OneDrive account on the computer, upload the files to be transferred to the OneDrive folder; log in to the OneDrive app on iPhone with the same account, browse the uploaded files, and download or save them to iPhone as needed.
Advantages: Good compatibility with Windows system, seamless connection with Office; Limitations: Requires internet connection, limited by OneDrive storage space
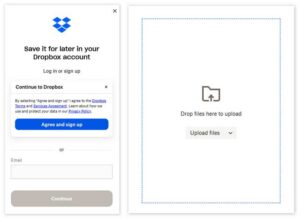
As a popular global cloud storage service, Dropbox supports multi-device synchronization and file sharing, suitable for scenarios where you need to collaborate with others to transfer files.
Operation: Log in to Dropbox account on the computer, upload the files to be transferred; install the Dropbox app on iPhone and log in, you can view the uploaded files in real time, and support downloading for offline access.
Advantages: Cross-platform compatibility (supports Windows, Mac, iOS, Android), convenient file sharing; Limitations: Small storage space for free version, transfer speed depends on network stability
File transfer between computer and iPhone is not a difficult problem. The key is to choose the right method according to your own needs: for efficient full compatibility, prioritize FoneTrans; for official tools without complex transfers, you can use iTunes; for wireless and convenient operation, iCloud Drive and Documents app are good choices; for emergency transfer of small files, email is sufficient. It is hoped that the 9 methods in this article can help you get rid of transfer troubles and make iPhone data management more efficient and flexible.


Copyright © 2025 DatasRecovery All rights reserved.