By Data RecoveryUpdated on February 03, 2026
When you need to transfer a large number of photos from your Samsung Galaxy phone to a computer, choosing an efficient and stable method can avoid issues like photo loss or duplication. Whether you’re a Windows user or a Mac user, you can find a suitable solution among the following 7 methods to easily back up and migrate your photos.

If you pursue convenience and comprehensiveness, MobieSync is definitely the top choice. Designed specifically for mobile device data management and transfer, it supports cross-device transfer of various file types such as photos, videos, contacts, and text messages. It is compatible with mainstream systems including Android 13-16, iOS 26, and Windows 7-11, and can also realize data synchronization between phones.

Operation Steps:
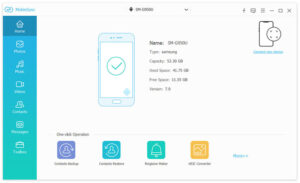
Step 1:Free download and install MobieSync on your computer. After launching the software, connect your Samsung phone to the computer via a USB cable. The software will automatically recognize the device and display basic information such as name, storage capacity, and system version.
Step 2:Click “Photos” in the file category bar on the left side of the software to browse all albums on your phone by type. You can also preview photo details in a large window and check the target photos you need to transfer.
Step 3:After selecting, click “Export to Computer”, choose the save path on your computer, and the photos will be transferred quickly.
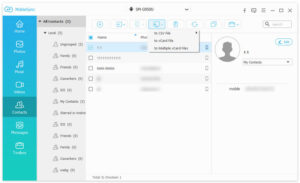
Additional Features: If you need to import photos from your computer to your Samsung phone, you can do so through the “Add Files” function at the top; the tool also supports cross-system data transfer between Samsung phones and iPhones.
The USB data cable is the most basic transfer method that requires no additional tools, suitable for most Samsung Galaxy models. However, it only supports transferring photos stored in the “DCIM” folder (the default storage path for albums).
Operation Steps:
Step 1:Connect your phone to the computer with a USB data cable. When the phone pops up an authorization prompt “Allow access to device data”, select “Allow”.
Step 2:Open the File Explorer on your computer. The Samsung phone will be displayed as an external storage device. Double-click to open it and find the “DCIM” folder.
![]()
Step 3:Preview the photos in the folder and drag and drop the required photos to the designated folder on your computer using the mouse.
If your Samsung phone supports inserting a micro SD card, you can transfer photos via the SD card, especially suitable for scenarios where you need to batch transfer a large number of photos. An SD card reader is required before operation.
Operation Steps:
Step 1:Insert a micro SD card with sufficient storage space into your Samsung phone.
Step 2:Open the photo album on your phone, select the photos you need to transfer, click the three-dot menu icon in the upper right corner, select “Move”, then choose the SD card as the target storage location, and click “Finish”.
Step 3:Remove the SD card from the phone and insert it into the card reader, then connect the card reader to the computer.
Step 4:Open the File Explorer on your computer, find the storage device corresponding to the SD card, and copy the photos to your computer.
![]()
Note: It is recommended to enable the computer’s antivirus software during the transfer process to avoid device attacks by malicious programs.
For Mac users, Google Photos is an excellent wireless transfer option. Each Google account provides 15GB of free storage space by default (without resolution restrictions), and high-resolution photos can be stored unlimitedly.
Operation Steps:
Step 1:Open the Google Photos app on your Samsung phone and click the three-line menu icon at the top of the screen.
Step 2:Go to “Settings” > “Backup & Sync” in sequence and select the Google account you want to use for backup.
Step 3:Click “Back up device folders” and turn on the switch for the photo folders you need to sync.
Step 4:Click “Upload size” and choose between “High quality” (unlimited storage for high-resolution photos) or “Original quality” (retains the original photo quality and occupies 15GB of free space).
Step 5:When the phone is connected to Wi-Fi, the photos will be automatically synced to the Google Photos cloud. Then open the Google Photos official website on your Mac computer, log in to the same Google account, and you can view and download the photos to your computer.

Samsung Smart Switch is an official transfer tool launched by Samsung, known for its efficient phone-to-phone data migration function. It also supports transferring phone photos to a computer for backup.
Operation Steps:
Step 1:Download Smart Switch from the Samsung official website and install it on your computer. After launching, connect your phone to the computer via a USB data cable and click the “Backup” button on the main interface of the software.
Step 2:You can choose “Select All” to back up all phone data, or customize the content to be backed up (ensure the “Pictures” option is checked). Click “OK”, and the software will generate a backup file containing photos on your computer.
![]()
Samsung Cloud is a cloud backup service natively integrated into Samsung devices, similar to iPhone’s iCloud. Although it is gradually being replaced by Microsoft OneDrive, it can still be used for photo export.
Operation Steps:
Step 1:Open “Settings” on your Samsung phone, click “Accounts and backup”, select “Samsung Cloud”, and enable the photo album sync function.
Step 2:After the sync is completed, visit the Samsung Cloud official website in a computer browser, log in to your Samsung account, enter the “Photo Album” section, select the required photos and download them to your computer.
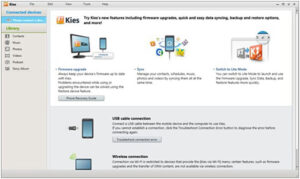
Samsung Kies is an early default sync tool for Samsung, only suitable for old Samsung phones and tablets released before Galaxy Note III, and does not support modern Samsung models.
Operation Steps:
Step 1:Install and open Kies on your computer, connect your old Samsung phone to the computer via a USB data cable.
Step 2:Click the phone name in the left sidebar of the software, and select “Backup/Restore” > “Data Backup” in sequence.
Step 3:Find the “Photos” option in the “Personal Information” area, click the “Backup” button, and you can transfer the photos from the old phone to the computer.
The above 7 methods cover different scenario needs: choose MobieSync for convenience, USB cable for temporary transfer, Google Photos for Mac users, and Kies for old Samsung phones. You can select according to your device model, computer system, and transfer requirements to easily achieve safe transfer and backup of photos from Samsung phone to computer.


Copyright © 2025 DatasRecovery All rights reserved.