By Data RecoveryUpdated on February 04, 2026
“Want to edit travel vlogs shot with iPad Pro in Final Cut Pro on Mac but can’t transfer them?” — Amy
“Downloaded TV shows on iPad take up 60GB storage; want to move them to MacBook Air but restricted by iTunes?” — Mark

Whether it’s high-definition videos shot with the camera, online-downloaded movies, or paid content from the iTunes Store, many iPad users have encountered the problem of “difficulty transferring videos to Mac”: regular operations can only transfer recorded videos, while movies, TV shows and other content cannot be exported due to iTunes’ one-way sync limitation. Even checking official guides rarely yields effective solutions.
Don’t worry! This article will detail 3 practical methods to help you easily transfer/backup all types of iPad videos (recorded videos, movies, paid programs, etc.) to Mac. Whether you want to free up device storage or conduct post-editing, you can solve it in one stop.
If you need to quickly transfer a single short recorded video, email transfer is a convenient option without additional tools. Later, you only need to log in to your email on Mac to download it.
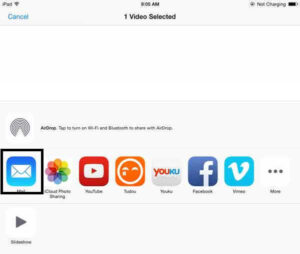
However, this method has obvious limitations: when transferring large-size or long-duration videos, it takes extremely long time and requires high network stability. Once the network is disconnected, you have to start over. It is more suitable for emergency transfer of short clips.
iPhoto is a pre-installed digital media management software on Mac. In addition to managing photos, it is also a native tool for transferring iPad recorded videos, but it cannot handle other video types such as movies and TV shows. The specific steps are as follows:
Step 1: Connect Devices
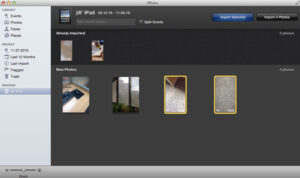
Connect iPad to Mac with a USB data cable. iPhoto usually starts automatically; if it doesn’t pop up, open iPhoto manually and find your iPad device name in the left navigation bar.
Step 2: Select and Import Videos
The main interface of the software will display all photos and videos in the iPad Camera Roll. Check the videos you want to transfer and click “Import Selected Items” to import the videos to the iPhoto Library.
Step 3: Copy Video Files
Go to the “Recently Imported” section in iPhoto, select the target videos, click “Edit” in the top menu bar, and choose “Copy”.

Step 4: Paste to Local Mac
Open “Finder” on Mac, click “Edit” in the menu bar, and select “Paste XX Items” (XX is the number of copied videos) to complete the local saving of recorded videos.

This method is suitable for scenarios where only recorded videos need to be transferred, but cannot cover all types of video needs. Want to transfer all videos at once? The professional tool below will completely solve this pain point.
The iPad video transfer tool designed specifically for Mac users supports one-click export of all iPad video types (recorded videos, movies, iTunes paid programs, online-downloaded TV shows, etc.). It is easy to operate and highly compatible, making it the best choice for solving complex transfer needs.
Step 1: Install and Run the Software
Download the transfer tool on Mac and launch it. The software supports Mac OS X 10.5 and above (including Mac OS X El Capitan) and can be used without complex configuration.


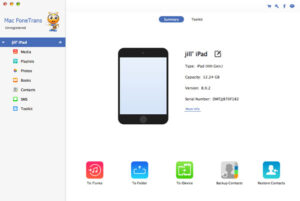
Step 2: Connect iPad to Mac
After launching the software, connect iPad to Mac with a USB data cable. The software will automatically recognize the device information and display it on the main interface, no manual pairing required.
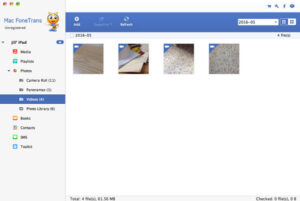
Step 3: Filter Target Videos
Click the “Media” option in the left sidebar to view all media files such as movies and TV shows on iPad, supporting real-time preview and filtering;
Click “Photos” > “Videos” to quickly locate all recorded video clips, avoiding omissions.
Step 4: One-Click Transfer to Mac
Check the video files you want to transfer, click “Export to” > “Export to Mac” at the top of the software, select the save path on local Mac, and wait for the transfer to complete.

The tool has strong compatibility, supporting all iPad models (iPad Pro, iPad Air 2/1, iPad mini 4-1, iPad 4-1, etc.), as well as all iPhone models (iPhone 16/15/14 series and earlier) and iPod devices.
In addition to video transfer, it also supports transferring various data such as contacts, text messages, notes, and music between iOS devices, and can also import files from Mac to iPad/iPhone/iPod in reverse. It is comprehensive and practical.


Copyright © 2025 DatasRecovery All rights reserved.