By Data RecoveryUpdated on February 05, 2026
“I just got an iPad mini 6 and want to transfer the downloaded albums to my MacBook Pro. How should I do it?” — Lily
“I’ve been using iTunes to sync music from my iPad Pro, which is stable, but sometimes I want to skip iTunes for direct transfer. Is there a more convenient way?” — Mark

Listening to music on iPad has long been a common habit, and transferring music from iPad to Mac for backup, editing, or playback is a must-have for many users. Whether you’re an experienced user who prefers iTunes or a new user looking for a more flexible solution, this article provides suitable step-by-step guides. Both methods are simple to understand, even for beginners.
With iTunes, you can directly back up and sync music from iPad to Mac, and then play it in iTunes or export it to a local folder.
Step 1: Install and Launch iTunes
Download the latest version of iTunes on your Mac, complete the installation, and open the software to ensure it runs smoothly.
Step 2: Connect iPad to Mac
Use the original USB cable to connect your iPad and Mac. Normally, iTunes will automatically recognize the iPad; if not, check if the USB cable is intact or restart the devices and try again.
Step 3: Back Up and Sync Music
After iTunes recognizes the device, a device icon will appear in the upper left corner. Click the icon to enter the device management interface. Select the “Summary” tab from the left menu bar and click “Back Up Now”. All data on your iPad (including music files) will be synced and backed up to iTunes on your Mac.
Once the backup is complete, you can play the music directly in iTunes. If you need to export it to your local drive, find the iTunes backup folder, copy the target songs from the playlist, and paste them into a custom local folder on your Mac. Note: To transfer purchased music, you need to log in with your Apple ID and authorize the current Mac device.
If you want to bypass iTunes, FoneTrans for iOS is a comprehensive iOS device transfer tool. It not only supports music transfer but also syncs photos, text messages, notes, videos, and other types of data. It is compatible with all iPad, iPhone, and iPod models as well as the latest iOS 18/17 systems, offering flexible operation and secure data transfer without loss.
As a professional iOS sync and management tool, FoneTrans for iOS has the following core features:
1.Directly sync music and playlists from iPad/iPhone to iTunes or local Mac;
2.Two-way data transfer: Supports cross-device migration between iOS devices and Mac, as well as Mac to iOS devices;
3.Classified management of iOS data, allowing precise selection of single or batch files for transfer without full sync;
4.Compatible with the latest iOS and MacOS versions, with fast transfer speed and strong stability.
Step 1: Download and Install the Transfer Tool
Download the FoneTrans for iOS client on your Mac, complete the installation as prompted, and launch the software.


Step 2: Connect iPad to Mac
Connect your iPad and Mac with a USB cable. The software will automatically detect the device and display device information. Proceed to the next step after confirming the connection is successful.
![]()
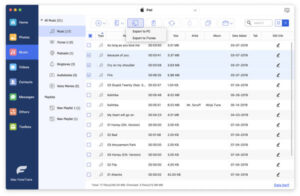
Step 3: Select Target Music Files
The left side of the software’s main interface classifies iPad data. Click “Audio & Video” and select “Music” from the expanded menu. All music files on your iPad will be listed; check the songs you want to transfer.
Step 4: Start Transfer and Select Storage Location
Click the “Transfer to” button at the top of the interface, select “Transfer to Mac” from the drop-down menu, then choose the storage path for the music on your Mac and click “Confirm” to start the transfer. If you need to sync to iTunes, select “Transfer to iTunes Library”.
With FoneTrans for iOS, you can not only transfer music quickly but also sync other data from your iPad in one stop. The operation steps are simple with no complicated settings, making it an excellent alternative to iTunes.


Copyright © 2025 DatasRecovery All rights reserved.