By Data RecoveryUpdated on February 04, 2026
iTunes is a classic tool for managing music and videos. Although it has been removed from the latest version of macOS, many users still use it to download and organize music on older macOS and Windows systems. A common question arises: how to smoothly transfer songs from iTunes to an Android phone? Don’t worry—this article details 3 reliable methods to help you achieve cross-platform music transfer easily. Among them, MobieSync is the preferred tool for its efficiency and security.
![]()
If you’re worried about data loss during transfer, MobieSync is definitely the top choice. It not only supports music transfer between iTunes and Android but also enables the exchange of photos, notes, contacts, and other data across iPhones, Android devices, and computers, featuring comprehensive and stable functions.
Core Advantages:
1.Comprehensive compatibility with data types: Supports all common iOS files such as contacts, photos, videos, audio, SMS, and call logs, meeting daily migration needs;
2.Bidirectional free transfer: Not only iPhone to Android, but also Android to iPhone. It also supports file transfer between computers and mobile phones (iOS/Android);
3.Data backup and management: One-click backup of mobile phone data to the computer, and you can directly view and edit various data in the mobile phone in the software, combining practicality and convenience;
4.Additional practical functions: Built-in ringtone maker and HEIC format converter, solving the problem of iOS photo format incompatibility with Android, with full functionality.
Operation Steps:
Step 1:Download, install and launch the software: Click the official legitimate channel to download MobieSync, complete the computer-side installation according to the on-screen prompts, and launch to enter the main interface;

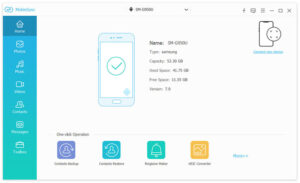
Step 2:Connect two devices: Connect both iPhone and Android phone to the computer with USB data cables. The software will automatically recognize the devices and display basic information such as device model, storage capacity, and system version on the interface;
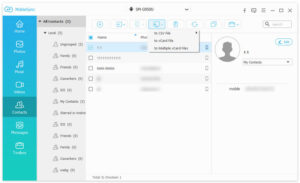
Step 3:Set the source device and select data: Since transferring from iPhone to Android, you need to set iPhone as the source device (can be switched through the device icon at the top of the interface); the left menu bar will list all iOS data by category. Click the corresponding category (such as “Photos” “Contacts”) and check the files to be migrated in the preview window on the right;
Step 4:Start data transfer: After confirming the selected files, click “Export to Device” and select the target Android phone, then wait for the transfer to complete. The entire process is stable and fast, with no data loss or damage.
In addition, MobieSync also supports various operations such as importing computer files to mobile phones and backing up iOS data to computers, making it an all-round tool for cross-device data management.
Apple Music offers a 1-month free trial, during which you can listen to over 100 million songs, browse thousands of ad-free playlists, and download songs for offline playback. However, note that after the free trial ends, unsubscribed users will no longer be able to play the downloaded songs—this is due to the Apple FairPlay protection mechanism that restricts the files.
Many people mistakenly believe that Apple Music doesn’t support Android, but that’s not true! As long as your Android device runs on version 5.0 (Lollipop) or higher, it can be installed and used normally; Chromebooks that support Android apps are also compatible.
Operation Steps:
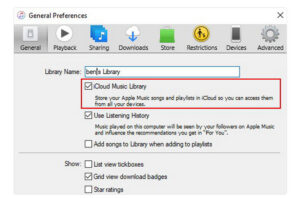
Step 1:Open iTunes on your computer, click “Edit” at the top of the main interface, and select “Preferences” from the drop-down menu.

Step 2:In the pop-up “Preferences” window, click the “General” option in the upper left corner, find “iCloud Music Library” and check it, then click “OK” to save the settings.
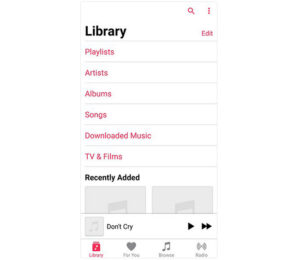
Step 3:Manually trigger the sync of iTunes songs to iCloud: click “File” in the upper right corner of the software, select “Library”, and then click “Update iCloud Music Library”. After the sync is complete, open the Apple Music app on your Android phone, switch to the “Library” tab, and you can view and play the recently synced music.
This method doesn’t require installing any additional software—you only need a computer’s file explorer and a USB cable. However, you must be extra careful during operation: when the device is connected to the computer, there is a risk of virus infection, and other files on the phone may be accidentally damaged. It’s recommended to back up your phone files to cloud storage services like iCloud or Google Drive, or other devices before operation.
Operation Steps:
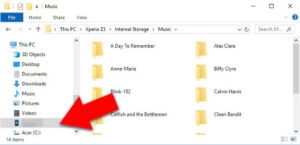
Step 1:Connect your Android phone to the computer using a USB cable. Select the “Transfer Files” option from the connection prompts on your phone, and the computer will successfully recognize the phone’s storage directory.
![]()
Step 2:Locate the folder containing iTunes music files on your computer, select the songs you want to transfer, and press the “Ctrl+X” shortcut (or right-click and select “Cut”).
Step 3:Find the storage path of your Android phone in the left panel of the computer’s file explorer (as the target folder), press the “Ctrl+V” shortcut (or right-click and select “Paste”), and paste the songs into the phone’s storage.
Step 4:After the transfer is complete, safely disconnect the phone from the computer and check if the files have been successfully transferred in the phone’s music player.
All three methods above can realize music transfer from iTunes to Android. Among them, MobieSync stands out as the first choice for most users due to its zero data loss and multi-function compatibility. If you need to transfer data across devices frequently, feel free to download and try this tool!


Copyright © 2025 DatasRecovery All rights reserved.