By Data RecoveryUpdated on March 23, 2026
If you’ve just got a new iPhone and want to transfer music from iPhone to iPhone without any hassle, or you need to share your favorite music playlists with friends who also use Apple devices, you may find the built-in Bluetooth function of iPhone far from convenient for this task. Many Apple users struggle with moving music files between iPhones—whether it’s downloaded songs, self-recorded audio, or music in the Apple Music library—and the default tools like iTunes and iCloud often bring troubles such as complicated operations and potential privacy risks.
A large number of users now choose FoneTrans as the best alternative to iTunes and iCloud for iPhone to iPhone music transfer. As a professional iOS data transfer tool, FoneTrans stands out for its ultra-fast transmission speed and 100% privacy protection, which perfectly solves the pain points of Apple users in cross-device music transfer. It has become the first choice for users who need to transfer music between iPhones safely and efficiently.
FoneTrans is not only capable of exporting iOS data such as contacts, calendars, photos and music from iPhone to Windows and Mac computers, but also has a powerful one-click transfer function for cross-device music sharing. The biggest advantage of this tool is that it supports direct music transfer from iPhone to iPhone without the need for a computer as an intermediate medium—you don’t have to copy music from the source iPhone to the computer first and then transfer it to the target iPhone, which saves a lot of time and operation steps. Whether it’s a single music file, an entire playlist, or lossless audio, FoneTrans can complete the transfer with high quality and no data loss.
Step-by-Step Guide to Transfer Music from iPhone to iPhone with FoneTrans
Step 1:First, download and install FoneTrans on your computer (supports both Windows and Mac systems), and launch the software after the installation is completed.


Step 2:Connect both the source iPhone and the target iPhone to the same computer with original USB data cables. FoneTrans will automatically recognize the two devices. For first-time users, you need to tap “Trust This Computer” on the iPhone screen to complete the device authorization.

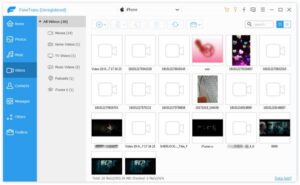
Step 3:On the FoneTrans main interface, select the source iPhone, find the Music tab in the left sidebar, and check the music files, playlists or audio you want to transfer—you can also click the “Select All” button to transfer all music at once. Then click the “Export to” option on the top toolbar and select the target iPhone from the drop-down list.
Step 4:Wait for a short while for the transmission to complete, then unlock the target iPhone and check the Music app or local files—you will find all the selected music has been successfully transferred.
If you have a demand for long-term preservation of music files, it is recommended to use FoneTrans to transfer iPhone music to computer for backup, which can prevent accidental loss of music due to device damage or data deletion.