By Data RecoveryUpdated on January 25, 2026
“Accidentally deleted important Skype chats on my iPhone, which contain key work communications and conversations with friends and family. Is there a reliable way to get them back? Urgently seeking solutions, thanks!” – Many iPhone users have encountered similar troubles.
As a globally popular instant messaging and video calling app, Skype is widely used for work collaboration and family communication, thanks to its high-definition call quality and cross-regional connectivity. However, accidental deletion, system update failures, device malfunctions, and other issues may lead to the loss of Skype history (messages, contacts, chat photos, etc.). Don’t worry – this article will introduce a professional iPhone data recovery tool to help you efficiently retrieve deleted Skype history, supporting various iOS data recovery scenarios.
This professional tool is iPhone Data Recovery. It can not only accurately recover deleted Skype history on iPhone but also retrieve chat data from popular apps like WhatsApp, WeChat, Viber, and Kik. In addition, common iOS data such as contacts, photos, videos, notes, voice memos, and Safari browsing history can be recovered if accidentally deleted. The software is compatible with all iOS device models, including iPhone 7 (Plus), iPhone 6S (Plus), iPhone 6 (Plus), iPhone 5S/5C/5, etc., with full compatibility.
Tip: iPhone Data Recovery comes with an “Intelligent Recovery” feature that can accurately match recovery solutions based on the cause of data loss (e.g., accidental deletion, factory reset, jailbreak/iOS update failure, device loss/damage, password lock, stuck on Apple logo, etc.). Users who are unsure of the loss cause are advised to use this feature first.
Here’s how to scan and recover deleted files from iPhone without a backup:
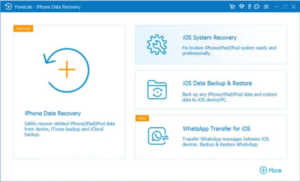
Step 1: Launch iPhone Data Recovery on Computer
Launch the iPhone data recovery on your computer, then select “iPhone Data Recovery” feature.
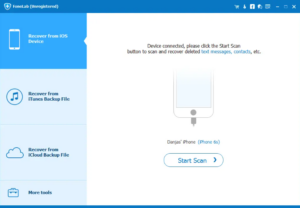
Step 2: Connect iPhone to Computer
To scan and recover data from iPhone devices directly, then select “Recover from iOS Device” and connect your iPhone to the computer via a USB cable.
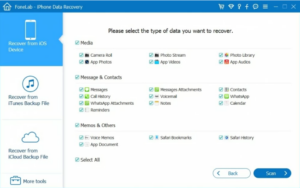
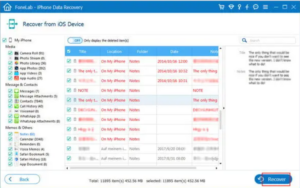
Step 3: Select Type of Data and Scan the iPhone
Then, please select type of data you need to recover, click “Start Scan” to scan your iPhone’s memory, the software start to find the deleted data from your iPhone device directly.
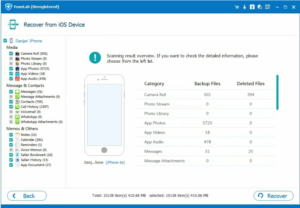
Step 4: Choose Deleted Data to Scan
After the software has fully scanned your iPhone’s internal storage, it will classify your files and data into the three categories: Message & Contacts, Media, Memos & Others. You can click on the specific subdirectories to view the recoverable files. Now, navigate to the list of items you want and select the data to recover.
Step 5: Recover iPhone Data
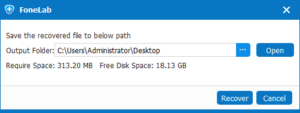
When you are done selecting, click the “Recover” button and customize the location where you want to store the recovered iPhone files in the pop-up dialog box, then hit “Recover” to start the recovery process.
Click the “Recover” button, then choose a location on the hard drive, and hit the “Recover” button again to save the lost/deleted data onto your computer. To recover contacts from iPhone, the contacts will then be saved as HTML or CSV file to your chosen path.
Here’s how to recover data from wiped iPhone by extracting from iTunes backup selectively.
Step 1: Select Recover from iTunes Backup
Run the program, and select “Recover from iTunes Backup” mode.
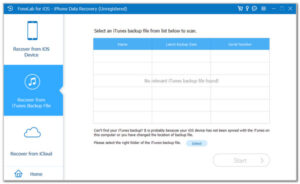
Step 2: Scan Data from iTunes Backup File
Then, choose an iTunes backup and click “Scan” button, the tool will automatically scan the iTunes backup made from the computer.
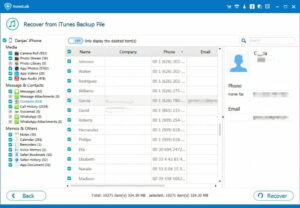
Step 3: Preview and Recover Data
After scanning completed, all the lost and deleted data included in the backup. You can preview them in detail, then click the “Recover” button start to recover and save data you want to computer.
The mentioned this iPhone data recovery software supports all iOS versions and models, it can free to scan your iPhone devices and iTunes, then shows the preview of the deleted and existing data before you recover them. To avoid duplicate data from your iPhone or iPad, let’s teach you how to restore data from iCloud backup using iPhone Data Recovery.
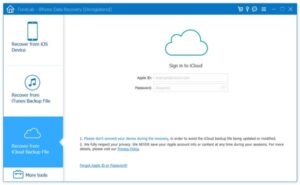
Step 1: Choose Recover from iCloud Backup File
Click “Recover from iCloud Backup File” in homepage and then log into your iCloud account (The same one as the former).
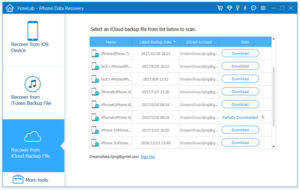
Step 2: Select iCloud Backup History to Scan
Choose the iCloud Backup button at the bottom left and choose the backups you want to recover. Follow the on-screen instructions afterward to complete the procedure.
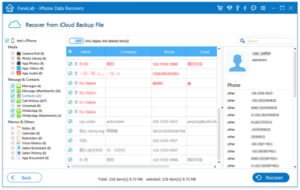
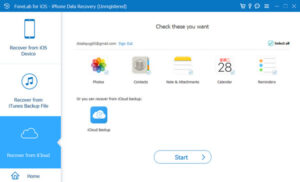
Step 3: Scan and Recover iCloud Data
After scanning completed, then you can preview your backups in iCloud backup. Next you can choose data that you want to recover and make it in the list. Confirm data that you want to recover and next you can click “Recover” to finish.
Recover iPhone Lost/Deleted Photos from iCloud Backups
Free download the iPhone data recovery and start to recover your iPhone lost or deleted data now!


iPhones store important data from our lives and work, and data loss can be stressful. However, as long as you choose the right method, most lost files can be retrieved. Whether it’s an emergency without a backup, or a regular scenario with iCloud or computer backups, the three recovery solutions introduced in this article can meet your needs. If you encounter data loss issues, you can choose the appropriate method based on your situation. Meanwhile, remember to back up regularly to avoid data loss troubles at the source.

Copyright © 2025 DatasRecovery All rights reserved.

