By Data RecoveryUpdated on January 23, 2026
The built-in “Voice Memos” app on iPhone is a handy tool for daily life and work—whether it’s a sudden inspiration, an important interview recording, or a cherished audio clip, it lets you store them easily. However, accidents happen: accidental deletion, recordings disappearing after settings adjustments, which can be frustrating.
Don’t worry! No matter how your voice memos were lost or if you have a backup, you can retrieve them with the following 4 methods. Save this detailed guide; it will save you a lot of trouble when you need it most~
When you delete a voice memo on iPhone, it won’t be permanently removed immediately. Instead, it’s moved to the “Recently Deleted” folder and retained for 30 days. This is the most straightforward method without additional tools—try it first:
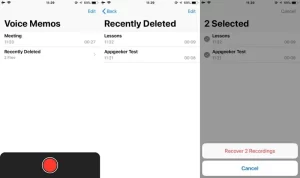
1.Open the “Voice Memos” app on your iPhone and tap “Recently Deleted” at the bottom.
2.Once inside, tap the “Edit” icon in the top-right corner.
3.Select the voice memo(s) you want to recover.
4.Tap “Recover” at the bottom of the screen, then choose “Recover Recording”—the file will automatically return to its original position in the timeline.
If you can’t find the target recording in “Recently Deleted” and have no iCloud or iTunes backup, third-party data recovery tools are your solution. Among them, iOS Data Recovery is a reliable choice with high success rates. It can deeply scan your iPhone’s internal storage, accurately extract recoverable voice memos, and also support restoring contacts, photos, text messages, and other files.


Step-by-Step Guide:
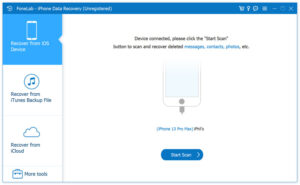
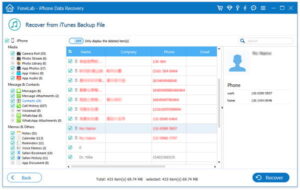
Step 1 Connect Your Device to Computer: Launch iOS Data Recovery, select the “Recover from iOS Device” mode, connect your iPhone to the computer via a USB cable. After the software recognizes the device, click “Start Scan”.
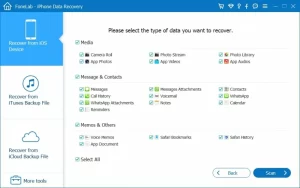
Step 2 Select File Type to Scan: In the pop-up interface, find and check the “Voice Memos” option (you can select this type alone to improve scanning efficiency), then click “Scan”—the software will perform a deep and comprehensive search of your device.
Step 3 Preview and Save to Computer: After scanning, all recoverable voice memos will be displayed by name, size, and duration. Check the files you want to recover, click “Recover”, and choose a save path on your computer to complete the retrieval.
If you backed up your iPhone via iTunes (Windows or macOS Mojave and earlier) or Finder (macOS Catalina 10.15 and later) before losing the recordings, you can recover them as follows:
1.Connect your iPhone to the computer used for backup with a Lightning cable, and open iTunes or Finder.
2.Once the software recognizes the device, click the device icon to enter the settings interface.
3.In the “Backup” section, select “Restore Backup”.
4.Choose the backup that contains the target voice memos from the backup list (we recommend selecting the most recent one), then click “Restore”.
5.Keep the device connected to the computer until the recovery process is complete—the recordings will sync to your iPhone automatically.
![]()
If you have enabled iCloud Backup and haven’t added a large amount of new data to your device after losing the recordings, you can recover via iCloud Backup. Note: This method will reset your iPhone to the state of the backup—be sure to back up important data on your current device first.
1.Open “Settings” on your iPhone, go to “General” > “Transfer or Reset iPhone” > “Erase All Content and Settings”.
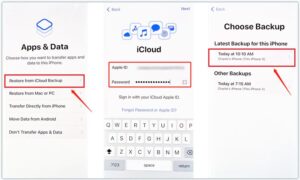
2.Complete the device initialization setup until you reach the “Apps & Data” screen.
3.Select “Restore from iCloud Backup” and log in to your iCloud account with your Apple ID.
4.Choose the most relevant backup from the list (prioritize the latest backup that includes the recordings) and wait for the recovery to finish—the voice memos will sync back automatically.
If not only the recordings are gone but also the Voice Memos app icon, you may have accidentally deleted the app or hidden it. Try these solutions:
1.Open the App Store, search for “Voice Memos”, and tap “Download” (if it shows “Open”, the app is not deleted but just hidden).
2.If you still can’t find it after downloading, go to “Settings” > “General” > “Transfer or Reset iPhone” > “Reset” > “Reset Home Screen Layout”—the app will return to the default “Utilities” folder.
3.Enable iCloud Sync: Go to “Settings” > “[Your Apple ID]” > “iCloud”, ensure the “Voice Memos” toggle is turned on—recordings will sync to your device automatically.
After retrieving the recordings, sharing them with others is simple:
1.Open the “Voice Memos” app and find the recording you want to share.
2.Tap the “three dots” icon next to the recording, then select “Share” from the pop-up menu.
3.Choose a sharing method (e.g., Messages, Mail, WeChat, AirDrop, etc.).
4.Select the recipient and tap “Send” to complete the sharing.

Copyright © 2025 DatasRecovery All rights reserved.

