By Data RecoveryUpdated on January 26, 2026
Accidents happen: your iPhone slips and shatters the screen, gets water-damaged and dies completely, or is locked and unusable. Compared to the device itself, the important data inside—photos, contacts, text messages, etc.—is far more distressing. Many users wonder: “If my iPhone won’t turn on or unlock, can I still recover the data?” The answer is yes! This article will detail complete methods to recover data from a damaged iPhone, whether you have a backup or not, making it easy even for beginners.

Whether your iPhone is damaged by dropping, water, impact, or other accidents—whether it’s a minor malfunction or completely ruined—the top priority is to get a professional device inspection. If the damage is severe (e.g., unresponsive shattered screen, deformed body), never attempt to disassemble the device or charge it yourself. Unprofessional operations may further damage internal hardware, increasing the risk of data loss. It’s recommended to take the device directly to an Apple Store or a reputable professional repair shop. Let the staff assess the device’s condition before deciding on subsequent repair or data recovery plans.
If you don’t have backups in iTunes or iCloud, or if your iPhone is too damaged for official tools to recognize, iPhone Data Recovery is highly recommended. It can extract data directly from the damaged iPhone without relying on backups, compatible with scenarios like shattered screens, dead devices, and unbootable iPhones. Here are the detailed steps:


Step 1: Install and Launch the Tool
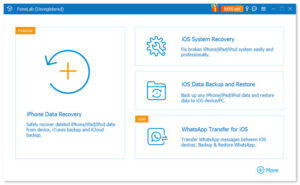
Download and install iPhone Data Recovery, then open the software. On the main interface, select the “iPhone Data Recovery” feature (this function safely recovers deleted data from iOS devices, iTunes backups, or iCloud backups) and enter the dedicated data recovery window. Additionally, the tool includes practical features like iOS System Repair, Data Backup & Restore, and WhatsApp Transfer to meet various needs.
Step 2: Connect the Damaged iPhone to Computer
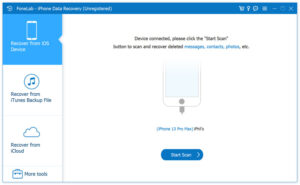
The tool defaults to the “Recover from iOS Device” mode. Connect the damaged iPhone to your computer using a USB cable. After connecting, tap “Trust” on the iPhone to authorize the connection. The tool will quickly recognize the device and display details like the iPhone’s name and model. If prompted “Device connected but not recognized,” check if the USB cable is intact and retry by reconnecting.
Step 3: Scan All Data on the Device
Click the “Start Scan” button on the tool interface. The software will fully scan all data on the iPhone, including existing files and deleted files (scanning is fast, completing in seconds). After scanning, the tool will show statistics such as the total number of files found and the occupied storage space. For example: Successfully scanned 14,842 items (2.01GB), covering photos, text messages, app data, etc.
Step 4: Preview and Selectively Recover Data
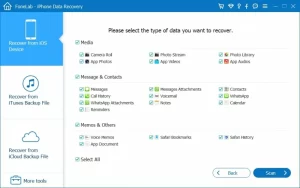
Scan results are categorized on the left panel, including Camera Roll, Photo Library, Text Messages, Contacts, Notes, WhatsApp Messages & Attachments, App Audio/Video, etc. You can click any category to preview files: deleted files are marked in red, and existing files in black. You can also enable the “Only show deleted items” toggle to accurately filter the data you need to recover. After selecting the target data, click the “Recover” button to export the data to your computer for later viewing and use.
Common recoverable file types: Camera Roll, Photo Stream, Photo Library, App Photos/Videos/Audio, Text Messages, Contacts, Voicemail, WhatsApp Messages & Attachments, Notes, Reminders, etc.
If your iPhone is too severely damaged (e.g., completely shattered, stolen) to connect to the computer via USB, you can still recover data from iTunes or iCloud backups (if you created them earlier) using Aiseesoft’s tool. Below is a step-by-step guide using an iTunes backup as an example:
Step 1: Launch the Tool and Select Backup Recovery Mode
Open iPhone Data Recovery and select the “Recover from iTunes Backup File” mode from the left panel (ensure iTunes is installed on your computer; otherwise, the backup files cannot be read).
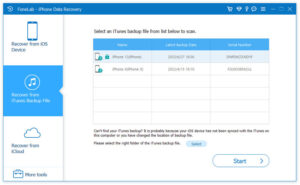
Step 2: Select and Scan the Target Backup
The tool will automatically list all iTunes backup files on your computer. Each backup displays the corresponding device name, latest backup date, and serial number. Select the backup you need (it’s recommended to choose the most recent one for more complete data) and click the “Start Scan” button. The tool will deeply analyze all data in the backup.

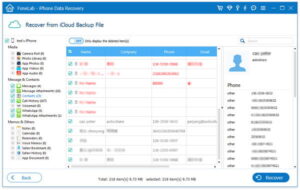
Step 3: Preview Backup Files and Recover
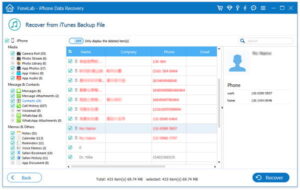
After scanning, all files in the backup are categorized on the left panel. You can click any category to preview details, and also filter content by enabling “Only show deleted items.” Select the photos, text messages, contacts, and other data you want to recover, set the save path on your computer, and click the “Recover” button in the lower right corner. The data from the backup will be exported to your computer—no data loss occurs during the process, and the operation is simple and efficient.
If you used iCloud for backups, the operation logic is similar: select the “Recover from iCloud Backup” mode, log in to your iCloud account, choose the target backup, and recover after scanning.
If you find data recovery operations complicated, or if your device has special faults (e.g., severe hardware damage), seeking help from Apple’s official team is the safest choice. Apple’s professional technicians can accurately identify hardware issues and provide exclusive data recovery guidance. You can make an appointment at an Apple Authorized Service Provider or contact Apple’s official customer support online for diagnostic assistance. When describing the problem, be sure to detail the device failure (e.g., “Won’t turn on after dropping” “Screen black after water damage”). Technicians will provide professional methods and tools unavailable to ordinary users based on the situation, helping you retrieve important data with step-by-step guidance—no need to worry about operational errors.

Whether your iPhone is shattered, water-damaged, dead, or locked, you can successfully recover data with the right methods: use iPhone Data Recovery to extract data directly from the device if you have no backup; retrieve data from iTunes or iCloud backups if you have them; or seek help from Apple officials if you struggle with self-operation. We hope this guide helps you solve data recovery problems and protect your important information from loss.

Copyright © 2025 DatasRecovery All rights reserved.

