By Data RecoveryUpdated on January 21, 2026
In the digital age, the built-in “Notes” app on iPhone, iPad, and Mac has long become a core tool for us to record inspiration and store important information. It makes information management efficient and convenient, but accidental deletion of notes still inevitably occurs, causing troubles in work and life. Fortunately, the synchronization and backup mechanism of the Apple ecosystem provides multiple possibilities for data recovery. This article will fully break down the most practical recovery solutions to help you easily retrieve deleted notes on iPhone, iPad, and Mac.

iPhone Data Recovery is a professionally optimized and upgraded tool designed specifically for data recovery on iOS devices. It can not only quickly retrieve accidentally deleted notes but also recover various data such as contacts, text messages, photos, videos, and call logs—even if these data only exist in iTunes or iCloud backups, they can be easily extracted. Its biggest advantage is that it supports previewing recoverable data, allowing you to accurately select the content you need to retrieve and avoid redundant recovery. The specific operation steps are as follows:
Step 1:
Click the official download link to get the application installation package on your computer, complete the installation and basic configuration according to the prompts (the whole process only takes about 1 minute), and launch the application after installation.


Step 2:
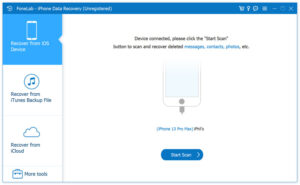
Select the “Recover from iOS Device” mode in the application interface, and connect your iPhone or iPad to the computer via a data cable. When the device pops up the prompt “Trust this computer”, click confirm to establish the connection.
Step 3:
After the device is successfully connected, click the “Start Scan” button, and the application will automatically retrieve all recoverable files in the device. The scanning time depends on the amount of data, usually between a few seconds and 1 minute.
Step 4:
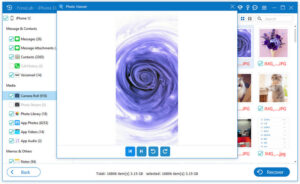
After the scan is completed, find the “Notes and Others” option in the left function bar, check the “Notes” category, then select all the note entries you need to recover in the right list, and finally click the “Recover” button to export and save the selected notes to your computer.
As an official media management and device backup tool launched by Apple, iTunes is not only applicable to the Mac system but also has a Windows version available. Through it, you can directly back up or restore all content of your iPhone or iPad, but you need to pay attention to two points: first, the latest version of the Mac system no longer pre-installs iTunes; second, this method is only applicable if you have previously created a device backup through iTunes. The specific operations are as follows:
Step 1:
Launch the iTunes application on your computer, and connect your iPhone or iPad to the computer with a data cable.
Step 2:
When your device’s avatar icon appears on the iTunes interface, click to enter the device summary page.
Step 3:
Find the “Restore Backup” option on the summary page, click it, and select the backup file containing the target notes (make sure the backup was created before the notes were deleted).
Step 4:
After confirming the backup file, click the “Restore” button again and wait for the recovery process to complete. Note: This operation will overwrite all current content of the device with the data in the backup, so please back up important data in advance.
iCloud is Apple’s cloud storage and synchronization service. Unlike iTunes’ local backup, iCloud backup data is stored on Apple’s cloud servers and does not rely on physical devices. As long as you have previously enabled the iCloud synchronization function for notes, you can recover accidentally deleted content through cloud backup. The specific steps are as follows:
Step 1:
Open the “Settings” of your iPhone or iPad, enter the “General” option, select “Reset”, then click “Erase All Content and Settings”—this operation will clear all data on the device, so please make sure you are fully prepared.
Step 2:
Complete the initial setup according to the guidance on the device screen until you enter the “Apps & Data” interface. At this time, select “Restore from iCloud Backup”, log in with your iCloud account and password, then select the backup file containing the deleted notes.
Step 3:
After selection, the device will start downloading and restoring backup data from the cloud, and will automatically restart after the recovery is completed. After restarting, open the “Notes” app to check if the accidentally deleted content has been successfully retrieved.
For Mac users, Aiseesoft has launched an exclusive Mac Data Recovery tool. Its design concept is consistent with the iPhone version, with a concise and intuitive interface that even computer novices can easily operate. This tool supports recovering various lost or deleted data on Mac, including notes, and is the preferred solution for Mac users to recover notes. The specific operations are as follows:
Step 1:
Free download Mac Data Recovery from the official channel, double-click the installation package to complete the quick setup, and then launch the application on your Mac.
Step 2:
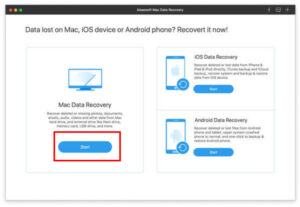
After launching, select the “Mac Data Recovery” function in the main interface of the application, and click the “Start” button to proceed to the next step. If your Mac is running Mac OS 10.11 or a higher version, you need to disable System Integrity Protection first to ensure the application can scan and recover data normally.
Step 3:
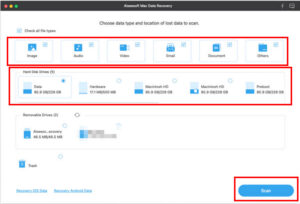
In the file type selection interface, since you need to recover notes, you need to check the “Others” and “Documents” options; then select the disk partition to be scanned in the disk selection list, and click the “Scan” button to start retrieving recoverable files.
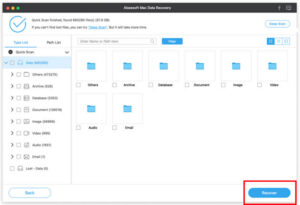
Step 4:
After the scan is completed, all recoverable files will be displayed in the left panel by category. Find and expand the note-related category, check the notes you want to retrieve, and click the “Recover” button to restore the selected notes to the specified location on the Mac system.
Frequently Asked Questions About Note Recovery
1. How to quickly undo the deletion of notes on iPhone?
Unfortunately, the iOS system does not have a native “Undo Delete” function to directly retrieve notes. Once deleted, the notes will be automatically moved to the “Recently Deleted” folder in the “Notes” app. This folder has a certain storage period, and the data will be permanently deleted after expiration. If it has not expired, you can recover it directly in this folder; if it has expired, you need to use professional tools or backup methods introduced above.
2. Can permanently deleted notes on iPhone be retrieved?
Before notes are permanently deleted, they will be stored in the “Recently Deleted” folder (usually retained for 30 days, the specific duration varies by device settings). If not recovered after the retention period, the data will be permanently deleted and cannot be retrieved by conventional methods. At this time, you can try to use professional tools such as iPhone Data Recovery for deep scan recovery.
3. How to find the “Recently Deleted” folder for iPhone notes?
Open the “Notes” app, enter the “Folders” page, slide down to the bottom of the page, and you can find the “Recently Deleted” folder. Click to enter, view all recently deleted notes, select the content to be recovered, and click “Recover” to move it back to the original folder.
4. Are there any third-party note recovery tools besides official methods?
There are many third-party recovery tools on the market, among which Aiseesoft series tools perform outstandingly: iPhone Data Recovery can be used to recover notes on iPhone/iPad, and Mac Data Recovery can be used to recover notes on Mac. These tools support the recovery of various data types, have deeper scanning depth and higher recovery efficiency, and are effective supplements to official methods.
5. How to avoid losing notes on iOS devices or Mac?
The most effective preventive method is regular backup: iOS devices can be automatically backed up via iCloud or manually backed up via iTunes; Mac can enable the Time Machine backup function or synchronize notes via iCloud regularly. In addition, it is recommended to avoid misoperations, carefully confirm before deleting important notes, and create copies of notes for backup if necessary.
Retrieving deleted notes on iPhone/iPad/Mac does not require complicated operations: if you do not want to overwrite the existing data on the device, iPhone data recovery tools are the best choice, supporting precise recovery and preview screening with simple and efficient operations; if you have previous iTunes or iCloud backups and can accept device data reset, you can also solve it through official backup recovery methods. For Mac users, Mac Data Recovery has become the preferred tool for note recovery with its intuitive interface and powerful scanning capabilities. Regular backups can fundamentally reduce the risk of note loss and make information storage more secure.

Copyright © 2025 DatasRecovery All rights reserved.

