By Data RecoveryUpdated on January 19, 2026
iPhone data loss is more common than we think—it could be accidental deletion of important messages, software glitches from failed system updates, or hardware damage caused by accidental drops. These scenarios can make precious family photos, critical work documents, or core contacts disappear, leaving you helpless. Fortunately, whether you have a backup or not, there are reliable ways to recover your losses. This article details three practical iPhone data recovery solutions to help you retrieve lost files efficiently.
If you haven’t backed up your iPhone with iCloud or iTunes, don’t panic when data is lost. iPhone Data Recovery can extract recoverable data directly from the device itself, making it the best choice for no-backup scenarios.
Steps:
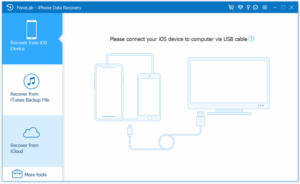
1.Download and install the software. Launch the program after installation, and connect your iPhone to the computer using an original USB cable.


2.The software offers three core recovery modes: “Recover from iOS Device”, “Recover from iTunes Backup File”, and “Recover from iCloud”. For the no-backup situation, select the “Recover from iOS Device” mode.
3.Once the software successfully recognizes the device, it will automatically start a full scan of all data on the iPhone (including deleted but not overwritten files). The scan duration depends on the amount of data stored on the device—more data may take longer, so please be patient.
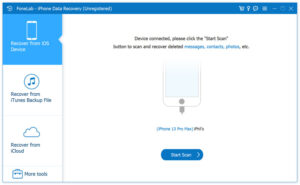
4.After the scan is complete, all recoverable data will be displayed by category (e.g., contacts, messages, photos, videos, documents). You can click on each category to preview specific file contents and accurately select the data you need to recover.

5.After confirming your selection, click the “Recover” button. Keep the iPhone connected to the computer stably during the recovery process—do not disconnect the USB cable until the progress bar is complete.
As Apple’s built-in cloud storage service, iCloud automatically syncs and backs up various data on your iPhone, such as contacts, photos, and videos. If you have enabled this feature in advance, you can quickly recover data through the following steps.
Steps:
1.First, confirm that iCloud Backup is enabled on your iPhone (you can check the backup status in “Settings” > “[Your Apple ID]” > “iCloud”).
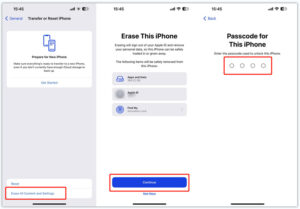
2.Before recovery, you need to erase the existing content on your iPhone: Go to “Settings” > “General” > “Transfer or Reset iPhone”, then select “Erase All Content and Settings”.
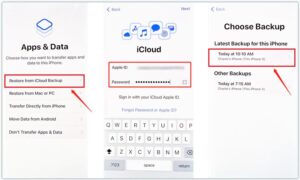
3.After the device is reset, it will enter the initial setup interface. Complete basic settings like language and network, then select “Restore from iCloud Backup” on the “Apps & Data” page.
4.Log in with your Apple ID, and the system will display all available iCloud backup files. Select the latest backup that contains the data you need, and wait for the recovery to finish.
For users who prefer managing their iPhones with a computer, iTunes (Windows) or Finder (macOS Catalina and later) are convenient recovery tools that can retrieve deleted data through previous backup files.
Steps (Windows/iTunes):
1.Connect your iPhone to a Windows computer using a USB cable, and open iTunes (if not installed, download it from Apple’s official website first).
2.Once iTunes recognizes your device, click the device icon to enter the “Summary” page.
3.In the “Backups” section, click “Restore Backup”, select the correct backup file that contains the lost data from the pop-up list, and click “Restore” to start the recovery process.
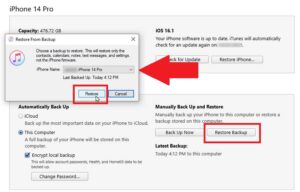
⚠️ Note: Restoring via iTunes will overwrite all content on your current iPhone with the data from the backup. Please confirm whether you need to retain existing data in advance.
Steps (macOS Catalina and later/Finder):
1.Connect your iPhone to a Mac computer using a USB cable, and open the Finder app (you can launch it via the Dock or Spotlight search).
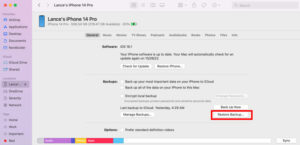
2.Find and click your iPhone’s name in the “Locations” section on the left side of the Finder window to enter the device overview page.
3.Click “Restore Backup” on the page, select the latest backup that contains the required files, click “Restore”, and wait for the operation to complete.
iPhone Data Recovery Frequently Asked Questions (FAQs)
1. Can I recover data from a water-damaged iPhone?
Yes. But note: Do not charge or turn on a water-damaged iPhone, as this may cause a short circuit on the motherboard and increase the risk of data loss. It is recommended to turn off the device immediately, wipe off surface moisture, then use Aiseesoft iPhone Data Recovery to try extracting data, or contact Apple Official Support for professional help.
2. Can I retrieve data after factory resetting my iPhone?
It’s possible. The success rate of data recovery after a factory reset depends on whether the data has been overwritten by new content, the recovery tool used, and the time elapsed since the erasure. If no new data has been written, you can likely recover some or all data using the no-backup tool, iCloud, or iTunes/Finder backup mentioned in this article. It is advisable to develop the habit of regular backups to reduce the risk of data loss.
3. How to transfer data if the phone has hardware damage (e.g., cracked screen, unresponsive)?
If your iPhone has enabled iCloud Automatic Backup, the lost data may have been synced to the cloud, and you can obtain it by “Restoring from iCloud Backup”. If you have previously made a computer backup with iTunes/Finder, you can recover it via the backup after connecting the device. For severe hardware damage (e.g., motherboard failure), it is recommended to visit an Apple Store or authorized service provider for professional data extraction assistance.
iPhones store important data from our lives and work, and data loss can be stressful. However, as long as you choose the right method, most lost files can be retrieved. Whether it’s an emergency without a backup, or a regular scenario with iCloud or computer backups, the three recovery solutions introduced in this article can meet your needs. If you encounter data loss issues, you can choose the appropriate method based on your situation. Meanwhile, remember to back up regularly to avoid data loss troubles at the source.

Copyright © 2025 DatasRecovery All rights reserved.

