By Data RecoveryUpdated on January 29, 2026
In the iOS ecosystem, the iPhone is perfect for on-the-go shooting, while the iPad’s large screen delivers an immersive viewing experience. Therefore, transferring videos between the two has become a common need for many users. In fact, no complicated operations are required—here are 3 practical methods to easily transfer videos from iPhone to iPad. Choose the one that fits your needs for efficient results!
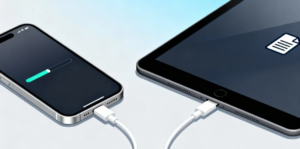
If you’re looking for fast, lossless, and batch transfer, FoneTrans is the ultimate solution. This data management tool developed specifically for iOS devices supports various data types such as videos, photos, contacts, and music. It enables flexible transfer between iPhones, iPads, computers, and iTunes—for example, you can also sync contacts from an iPod to other iOS devices, making it highly versatile.
Its core advantage is that it doesn’t compromise video quality during transfer, and it supports one-click batch transfer of multiple files, with a speed far exceeding conventional methods, saving a lot of time.


Step-by-Step Guide:
Step 1:Connect Devices: Download and install FoneTrans on your computer, then connect both your iPhone and iPad to the computer using USB data cables. (The unregistered version of the software can still use basic transfer functions, and the interface will display device name, model, storage capacity, system version, etc.)
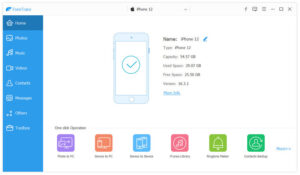
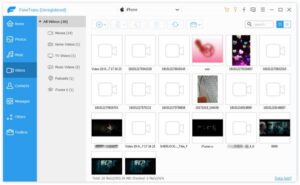
Step 2:Select Videos: From the device dropdown menu in the software, select the iPhone you want to export videos from. Then click “Videos” in the left sidebar to view all videos on the device, categorized into movies, home videos, music videos, etc., for easy browsing.
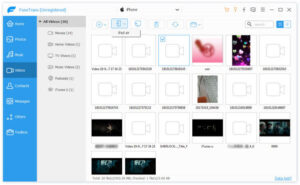
Step 3:Start Transfer: Click the “Export to Device” button in the software, select the target iPad from the pop-up list, and after the transfer is complete, you can watch the videos directly on the iPad.
For transferring a small number of short videos, AirDrop—built into iPhones and iPads—is an “instant tool”. It works based on Bluetooth and peer-to-peer WiFi technology, requiring no additional software installation. The steps are simple, making it ideal for temporary quick sharing.
Step-by-Step Guide:
Step 1:Enable AirDrop: On both your iPhone and iPad, open the Control Center, turn on Bluetooth and WLAN. Then long-press the top-left area of the Control Center to enable AirDrop, and select either “Contacts Only” or “Everyone” (ensure both devices can detect each other). You can also enable it via the “Settings” > “General” > “AirDrop” path.

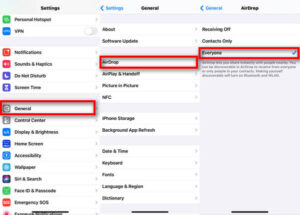
Step 2:Initiate Sharing: Find the video you want to transfer on your iPhone, click the “Share” icon in the top-right corner, select AirDrop from the pop-up options, and then choose the target iPad from the list of nearby detectable devices.
Step 3:Receive the Video: The iPad will immediately pop up a receive prompt. Click “Accept”, and the video will be automatically saved to the “Photos” app, no extra steps needed.

Notes
AirDrop has obvious limitations: transferring large-capacity or multiple videos will take significantly longer, resulting in low efficiency. Additionally, if you encounter issues such as unable to find devices or transfer interruptions, it’s recommended to switch to other transfer methods.
For users who need to transfer large video files and prefer using built-in iOS functions, iCloud sync is a good choice. As long as both devices log in with the same Apple ID, you can achieve cloud-based video sharing without data cables.
Step-by-Step Guide:
Step 1:Set Up on iPhone: Open “Settings” on your iPhone, tap your Apple ID at the top, select “iCloud”, and check the available storage space. Tap “Photos” and enable “iCloud Photos”. You can then choose “Optimize iPhone Storage” (to save local space) or “Download and Keep Originals” (to preserve video quality) based on your needs.
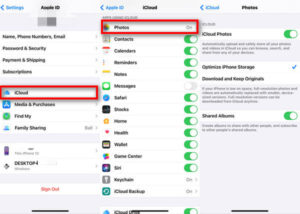
Step 2:Sync on iPad: Ensure the iPad is logged in with the same Apple ID as the iPhone. After enabling “iCloud Photos”, wait for a while—videos from the iPhone will be automatically synced to iCloud. You can then directly view and play the synced videos on the iPad.
Notes
iCloud only provides 5GB of free storage space, which will quickly run out for large video files. You need to subscribe to a paid plan for additional storage. Moreover, it only supports Apple devices, and some historical synced data may not be accessible when logging in on a new device. These issues can be avoided by using the FoneTrans tool.



Copyright © 2025 DatasRecovery All rights reserved.
 iPhone Data Recovery
  iPhone Unlocker
  Android Data Recovery
  Broken Android Data Extraction
  Android Unlocker
  Data Recovery (Windows/Mac)