By Data RecoveryUpdated on January 09, 2026
In the digital age, iPhone Notes has long been a core tool for recording daily trivialities, work key points, and moments of inspiration. However, with the expansion of usage scenarios—whether you want to integrate scattered notes, optimize the classification system, or switch to a more suitable note-taking platform—smoothly migrating iPhone Notes to a new management model requires a scientific and data-risk-free solution. This article will break down the full-process operation from multiple scenarios, allowing you to bid farewell to cumbersome and loss-prone note migration.
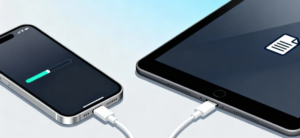
If you have always relied on Apple’s native “Notes” app and need to share notes between iPhone, iPad, Mac, and other devices, follow these steps for in-ecosystem synchronization:
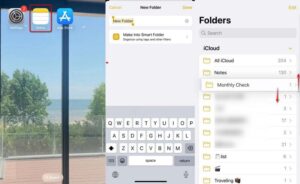
Step 1:Organize and categorize existing notes: Open the “Notes” app on your iPhone and build a folder system based on your new management logic. Click “New Folder” on the main interface to create folders, and support creating “Smart Folders” that can be filtered by tags. Then drag and drop notes into the corresponding folders (such as “Work Notes”, “Travel Plans”, “Monthly Review”, etc.). The category list will clearly display the number of notes under each folder for easy management.
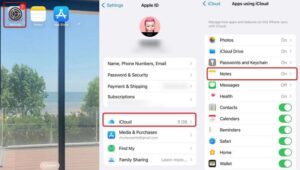
Step 2:Enable iCloud synchronization: Go to iPhone “Settings” > “[Your Name]” > “iCloud”, find the “Notes” option and turn on the synchronization switch. At this time, note data will be automatically backed up to iCloud (5GB of storage is provided by default), sharing storage resources with photos, iCloud Drive, and other apps.
Step 3:Access across Apple devices: Ensure that iPad, Mac, and other devices are logged in with the same Apple ID. Open the “Notes” app on these devices, and the categorized notes will be synchronized in real time, automatically adapting to the new management system for seamless access across multiple devices.
Even if you don’t use a Mac, you can quickly transfer notes to your computer using professional tools, both backing up data and freeing up iPhone storage. FoneTrans is recommended as a free tool, with the following operation steps:


Step 1:Device and software preparation: Download and install FoneTrans on your computer, and connect your iPhone to the computer via a USB data cable. After successful connection, the software will display device details (such as model, storage capacity, system version, etc.). The left menu bar lists data categories such as Photos, Contacts, Messages, and “Others”, while the right side provides functional modules such as “Toolbox” and “One-click Operation”.
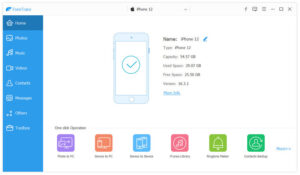
Step 2:Select target notes: Find “Others” in the left category and check the notes you want to transfer; for batch export, you can select “Phone to PC” for one-click operation through the “Toolbox”, check all relevant options, and click “Start”. The software will display the “File Been Selected” status.
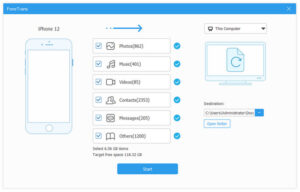
Step 3:Export and save: After confirming the selection, click the “Export” button, and the notes will be saved to the computer in the specified format, completing data migration.
If you want to switch to a note-taking tool outside the Apple ecosystem, follow this process for a smooth migration:
Step 1:Select a note-taking app that meets your needs: Based on your usage habits, choose a third-party app that supports iPhone and commonly used devices (computers, tablets). Popular options include Evernote, OneNote, Google Keep, Bear, Notion, Simplenote, etc.
Step 2:Export data from the native Notes app: Go to iPhone “Settings” > “Notes” > “Import Notes”, select the selected third-party tool from the pop-up app list, and start the export process.
Step 3:Import to the new app and organize: Open the third-party note-taking app and complete the operation according to its built-in import guidelines—some apps support direct import, while others require indirect import through exported files such as CSV or HTML. After import, use the classification function of the new app to create folders or tags, and reorganize notes according to the new management system.
Step 4:Enable synchronization and backup: Confirm that the new app has enabled cross-device synchronization, and check whether the notes are backed up to the app’s cloud storage or designated backup channel to ensure data security.
If you need to establish a clear hierarchical structure for notes, you can use apps that support nested folders or tag functions, as follows:
Step 1:Select a tool that supports hierarchical functions: Choose a note-taking app that allows creating subfolders or multi-dimensional tags to ensure detailed management under the main category.
Step 2:Build a hierarchical classification system: First create primary folders (such as “Work”, “Personal”, “Ideas”, “Projects”), then set subfolders or tags under each primary category to cover more specific topics.
Step 3:Categorize existing notes: Check each original note one by one, move it to the corresponding folder or add relevant tags according to the new hierarchical structure. Although it takes some time, it can greatly improve the efficiency of subsequent retrieval and management.
To avoid data loss or confusion during migration, it is recommended to follow these key points:
Step 1:Advance step by step, avoid rushing: Do not rush to complete all migrations at once; organize and transfer in phases to ensure the accuracy of each operation.
Step 2:Backup data before migration: Before starting any migration operation, back up notes through iCloud or third-party tools to prevent data loss due to unexpected situations.
Step 3:Synchronize review and streamlining: During the migration process, review notes simultaneously, delete outdated, duplicate, or irrelevant notes, and maintain the cleanliness of the new management system.
Step 4:Confirm cross-device synchronization: Ensure that the new note-taking app supports synchronization across all commonly used devices to achieve seamless access and updates anytime, anywhere.
Step 5:Make good use of tags for multi-dimensional retrieval: Tags can break through the limitations of folder classification, mark notes in multiple dimensions, and improve information search efficiency.


Copyright © 2025 DatasRecovery All rights reserved.
 iPhone Data Recovery
  iPhone Unlocker
  Android Data Recovery
  Broken Android Data Extraction
  Android Unlocker
  Data Recovery (Windows/Mac)