By Data RecoveryUpdated on January 10, 2026
With the widespread popularity of social media and the rapid development of portable devices, more and more users are enthusiastic about shooting videos in life and work and sharing them on mainstream platforms such as YouTube, Facebook, and Twitter. To make the shared videos convey ideas more accurately and eliminate useless content, it is particularly important to edit or trim the videos before publishing — at this time, a reliable video editing tool becomes a necessity.
Do you need to trim lengthy videos and remove the blank clips at the beginning and end? Do you want to split large-sized videos into multiple small clips for easy storage and dissemination? To complete these operations efficiently, a practical video editing application is indispensable. Unlike online editing tools that are time-consuming and labor-intensive when processing large videos, offline editing tools can bring a smoother user experience. Next, we will introduce a professional offline video editing tool — Video Converter Ultimate, and how to use it to easily complete video editing.
Core Advantages of Video Converter Ultimate
1.Can cut videos into multiple clips and merge scattered clips into a complete file;
2.Freely adjust the video duration and precisely trim it to the required length;
3.Compatible with 1000 audio and video formats, supporting integrated format conversion, editing, and compression;
4.Improve video quality while enhancing video resolution;
5.Stabilize shaky videos with one click for smoother images.


Detailed Operation Steps:
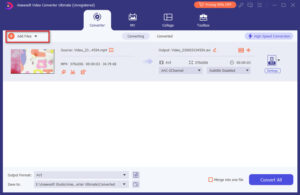
Step 1:Install the tool and import videos: After downloading the software, install and launch it on your computer (Windows/Mac). Click the “Add File” option at the top of the software to import the video materials that need to be trimmed.
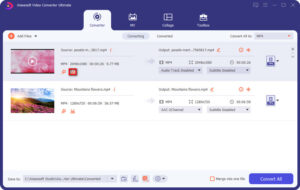
Step 2:Enter the editing interface: Find the “scissors” icon in the software and click it to open the editing operation window.
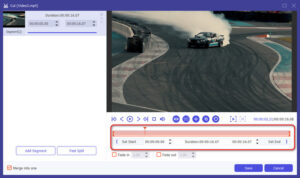
Step 3:Precisely crop useless parts: Determine the start and end positions of the video by dragging the progress bar, or manually enter the specific values of “Start Time”, “End Time”, and “Duration” to achieve precise editing.
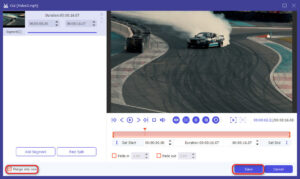
Step 4:Process clips and save changes: If multiple edited clips are needed, click “Add Clip” to create new editing content; you can also split the video through the “Split” icon next to the “+” icon. After processing the clips, adjust the order of the clips as needed to merge the videos, and then save all changes.
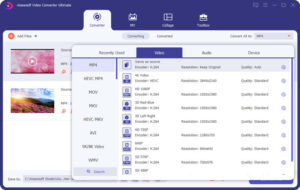
Step 5:Select the output format: Return to the main interface of the software, click the “Convert All” button, and select the appropriate output format from the pop-up options — it supports various formats such as 4K video, HD1080P, HD720P, MP4, AVI, MKV, WMV, etc. You can also customize encoder, resolution, and quality parameters.
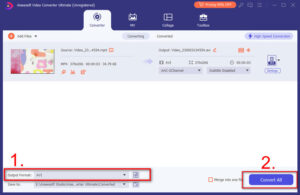
Step 6:Export the edited video: Click “Browse” to select the save path of the video, and finally click “Convert All” again to export the high-quality edited video to your computer.
Copyright © 2025 DatasRecovery All rights reserved.
 iPhone Data Recovery
  iPhone Unlocker
  Android Data Recovery
  Broken Android Data Extraction
  Android Unlocker
  Data Recovery (Windows/Mac)