By Data RecoveryUpdated on December 24, 2025

Is your computer running out of storage space? To free up space on your computer, you may need to delete some unnecessary files. However, there are times when you might accidentally erase important documents. In the past, once you clicked the delete button, it was impossible to recover deleted files on Windows. Fortunately, Microsoft recognized this issue and introduced the Recycle Bin feature for Windows back in 1995. Since then, accidental file deletion has no longer been a problem.
That said, this handy feature only works if the Recycle Bin folder has not been emptied manually or automatically. What’s more, some files do not go to the Recycle Bin when deleted. So is there a way to recover deleted files?
In this tutorial, we will show you everything you need to know about recovering deleted files on Windows. Whether you’re trying to retrieve photos, documents, audio files, or other types of data, you can get them back easily.
When it comes to retrieving deleted files on Windows, the top solution is investing in a robust data recovery tool that covers diverse recovery scenarios and delivers a high success rate.
Window Data Recovery stands out as one of the premier professional file recovery solutions for Windows. Its standout features include:
1.Retrieve accidentally deleted emails, photos, videos, audio files, documents, and other data types seamlessly on Windows.
2.Supports data recovery from internal hard disks, as well as external devices like digital cameras, USB flash drives, memory cards, and other removable storage media.
3.Recovers files lost due to accidental deletion, disk formatting, Recycle Bin emptying, system crashes, or other unexpected issues.
4.Provides a deep scan function if your target files aren’t found in the initial quick scan results.
5.Lets you preview thumbnails of recoverable files, giving you the flexibility to restore all items or only selected ones.
6.Accelerates scans for specific data types and disks using advanced hardware acceleration technology.
7.Fully compatible with Windows 11, 10, 8.1, 8, 7, Vista, and XP operating systems.


Step 1 Install the best undelete software on your computer
Access the official website, download the latest version of Data Recovery, double-click on the installer file and follow the onscreen instructions to get it installed on your PC. Then launch it from your desktop and you will be presented the concise home interface.
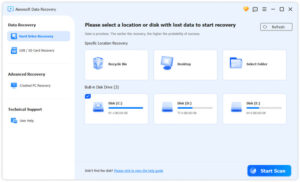
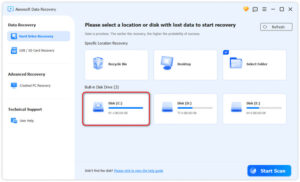
Step 2 Scan your disk to find the delete files
Select where you store the deleted files. If you need to recover files from flash drive, plug it into your computer and the software will recognize it. Hit the Start Scan button to perform scan.
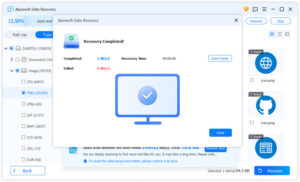
Step 3 Restore data in a single click
When you are taken to the result window, click the desired data type on the left side column, and then you can look at the deleted files on the right detail panel organizing by formats.
Now, your data has successfully recovered.
Try it now to restore your photos, audio, documents, and more in Windows!
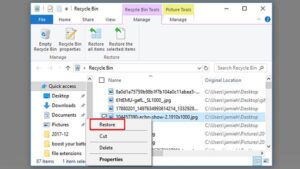
First off, the solution to recovering deleted files from a PC varies based on your specific scenario. As noted earlier, if you simply selected a file and pressed the Delete key, retrieving it is incredibly straightforward.
Head to the Recycle Bin folder on your desktop, right-click the deleted file, and select Restore. You’re all set! The file will be returned to its original location automatically.
However, it’s a different case if you used Shift + Delete to remove files or have already emptied the Recycle Bin. In these instances, the deleted files aren’t actually erased from your hard drive—they’re just hidden. Windows marks the storage space occupied by these files as “available,” meaning it will be overwritten by new data eventually.
Put simply, there’s still a chance to recover deleted files on Windows 11/10/8/7 before they’re overwritten by new data. The catch? You won’t be able to locate or access these deleted files without specialized software. But don’t fret—we’ll walk you through three top-tier methods to efficiently retrieve your lost files in the next section.
Note: This Recycle Bin recovery method only works if you haven’t emptied the Recycle Bin.
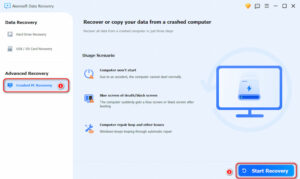
Sometimes, you don’t actually delete these files—instead, your PC crashes, leaving you unable to locate them. This is arguably one of the most complex data recovery scenarios. But don’t worry; there are still workable solutions to retrieve files from crashed computers or PCs experiencing boot issues. Let’s continue with Aiseesoft Data Recovery as an example: its dedicated Crashed PC Recovery mode enables you to recover a wide range of file types, including images, audio files, documents, emails, and more. Below are simple steps to carry out this recovery process.
Step 1.Download and launch this program and choose Crashed PC Recovery mode from the bar on the left. Then, click Start Recovery.
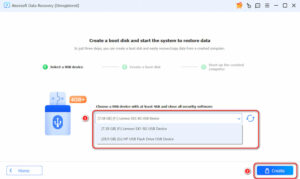
Step 2.Connect a USB flash drive (better larger than 4GB) to your computer and click Create to generate a bootable USB. Please note that this process will format your USB drive.
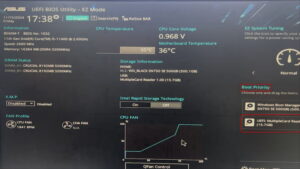
Step 3.When the bootable USB is created, insert it into your crashed PC. Then, start this computer into BIOS/UEFI settings by repeatedly pressing the BIOS/UEFI hotkey. Usually, they’re F12 or ESC on your keyboard.
Step 4.In the BIOS/UEFI interface, choose your bootable USB under Boot Priority to restart this computer.
Step 5.Here you can choose to deep scan all your files on this PC and copy them to a removable hard drive quickly.
Note: This method can only work on Windows computers.
If you prefer not to install any software on your computer, Windows also provides built-in free backup and restore tools to help you recover your files—making it ideal for text file recovery. This section focuses on the Previous Versions feature. Follow the steps below based on your Windows operating system:
How to Locate Recently Deleted Files via Previous Versions (Windows 7)
Step 1. Navigate to Start > Computer, then find the folder containing the file you need to recover.
Step 2. Right-click the folder and select Restore previous versions from the context menu.
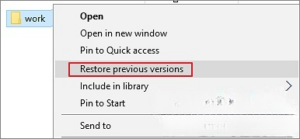
Step 3. A new pop-up window will appear, displaying a list of previous file versions with corresponding dates and times. Select the version you want to recover and click Restore.

How to Recover Deleted Files via Previous Versions (Windows 10/8.1/8)
Step 1. Open the Windows Control Panel.
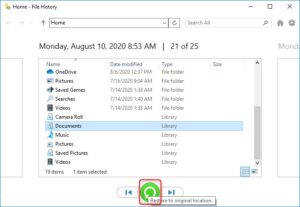
Step 2. Go to File History > Restore personal files.
Step 3. Click the green button in the bottom-middle of the window labeled Restore to original location.
Note: This built-in recovery feature often has limitations regarding data integrity, restricted storage space, and may even lead to data corruption.
Another built-in solution is Windows’ free backup tool—here’s a step-by-step walkthrough:
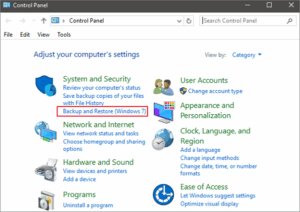
Step 1. Navigate to Start > Control Panel and select Backup and Restore (Windows 7).
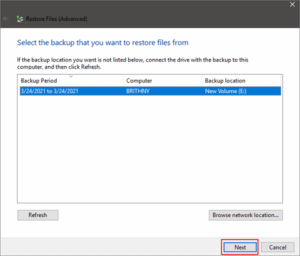
Step 2. Choose the option labeled “Select another backup to restore files from,” then pick your desired backup.
Step 3. Click Next to proceed and follow the on-screen prompts to complete the recovery process.
Note: This method only works for backups of specific folders and may slow down your PC due to heavy system workloads.
Google Drive serves as a convenient tool for Windows users to regularly back up and store files. For G Suite users, you can still recover files even after the 30-day trash retention period. Here’s a step-by-step guide:
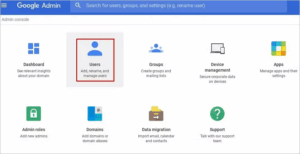
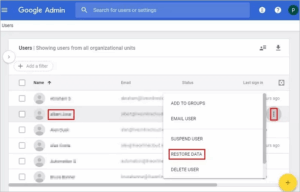
Step 1. Sign in to the Google Admin Console.
Step 2. From the main dashboard, select the Users section.
Step 3. Choose the user account associated with the data you want to recover, then click the three-dot menu on the right side of the account.
Step 4. In the new window that appears, locate your lost file, right-click it, and select RESTORE DATA.
Step 5. Select Drive as your target application, then click the RESTORE button to proceed.
Note: This feature is exclusively available to G Suite users. Additionally, in some cases, only partial file recovery may be possible.
In this post, we’ve covered comprehensive methods for recovering deleted files on Windows. Unsurprisingly, the Recycle Bin is your first stop when searching for deleted files on a Windows PC. However, there are scenarios where files get permanently deleted—such as when the Recycle Bin has been emptied. But there’s no need to panic—this isn’t a hopeless situation. We’ve outlined five reliable solutions and practical tips to help you resolve these file loss worries once and for all.
If the deleted files are critically important, we recommend giving Windows Data Recovery a try. Not only is it user-friendly, but it also efficiently retrieves nearly all types of deleted files from your device. We hope our guide proves valuable in helping you recover your lost data.
Copyright © 2025 DatasRecovery All rights reserved.